27.9.13

How to Create Raw Device Mappings in VMware for Microsoft 2012 SQL Clusters

How to Create Raw Device Mappings in VMware ESXi 5.0/5.1 for Microsoft Clusters (SQL 2012)

Hardware:
Hosts: IBM Flex System (4 node cluster x240s)
Storage: IBM Storwize V3700 & IBM Unified V7000

Software:
vCenter 5.1
ESXi 5.0 & 5.0 Enterprise
Microsoft Server 2008 R2
Microsoft Enterprise SQL 2012

Pre-Req’s: please read everything FIRST

1)      Volumes must be created individually on the SAN. Each volume needs to be the exact size (with maybe 5GB extra) of the drive that will be mapped to the virtual machine. For example:

a.       Volume A: 105GB (at the guest level- Drive E:\ size 105GB)

b.      Volume B: 205GB (at the guest level - Drive G:\ size 205GB)
2)      Also, because RMD’s create an additional .vmdk file for every RMD drive, IF you do not have room in the datastore the virtual machine lives in; you will need to create an additional volume on the SAN for the RMD mapping files.

3)      In our environment, the SQL VM lives on a datastore that is located on the physical local SSDs on the server, so this was a required step.

4)      DO NOT add them in vCenter. Map them from the SAN only – otherwise, they will be formatted with the VMFS format which is different than RDM. With the exception of the volume you create for the RDM files (see yellow highlighted volume). You will need this later.

Create Individual volumes (exact size of the drive space needed) for every RDM you'll need.
Go ahead and create the volume that will be used for the RDM map locations, add it to vCenter.
Map the new Volume to your hosts/cluster.
Once all of the volumes have been created on the SAN (leave the window up, you’ll reference .naa numbers (UUID) later), log into vCenter.
*** PLEASE NOTE: Prior to creating the RDM’s, the virtual machine MUST be powered OFF if it is to be used in a Microsoft Cluster (ie: SQL, Exchange).

FOR THE PRIMARY VIRTUAL MACHINE
Right Click the VM and select Edit Settings. 
Select Add…


 Select Hard Disk

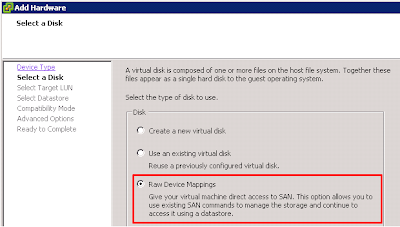
 Select Raw Device Mappings

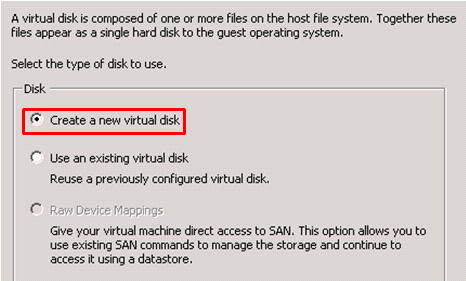
Because this is the primary virtual machine, select Create a new virtual disk. One the secondary, you will chose differently. 

All of the devices (volumes) that are available for RDM will be listed. Check the SAN GUI for the UID and make sure that the one you want to map matches within the configuration window in VMware. Also if the RDM volumes are different sizes, this helps to make sure you are mapping the correct volume.
*** Map what will be the Quorum Drive first *** this eliminates a lot of tasks later on. I’ll not get into those on this tutorial.


 Confirm the UID within the SAN admin GUI.


Next you select the datastore you want the RDM/LUN Mapping files to be stored. Typically storing them with the virtual machine is acceptable. Make sure you have efficient space in the volume the Guest VM resides in.


In my particular situation, the primary SQL Server was stored on local SSD’s on the physical host, so storing the RDM mappings was not possible. I created an additional datastore to house these so they could be seen by all VMs requiring access.


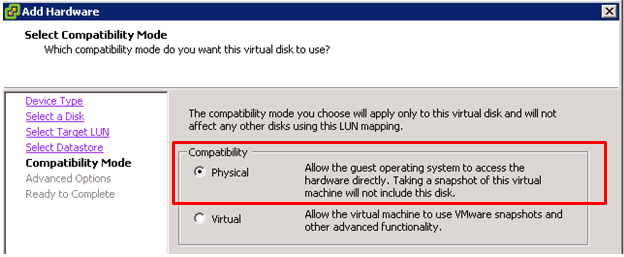
For the initial (primary) virtual server in the cluster I selected Physical. I kept this setting for the secondary VM as well.


OK so even though the wizard says these advanced options do not usually need to be changed, they do; especially if you plan on creating multiple RDMs and sharing them within a Microsoft Cluster of any sort.
Because the OS Hard Disk is using the SCSI ‘pool’ ID starting with 0: I opted to use the drop down and select the first SCSI ID 1:0. All consecutive drive connections using the SCSI controller in the 1:0-15 will inherit the same properties. This is relevant later.

Confirm that everything is correct.


Before you click OK, on the Edit Settings window of the virtual machine (it must be OFF) to complete this part.
Select the new SCSI Controller that was created when creating the RDM drive.
Make sure that the ‘Physical” SCSI Bus Sharing is selected, other wise when you map the secondary VM to the RDM file, it will fail (every time!).
Also all additional RDMs created using this SCSI controller will inherit the same properties, so drive sharing among VMs with RDMs will be a success.


Click OK. You’re finished mapping the Quorum RDM drive to the primary guest virtual machine.


For the Secondary VM that will share the drive:


Right click the VM, select Edit Settings. Click Add.
 
Select Hard Disk.

Click Next. Because this is the secondary guest in the Microsoft Cluster, select ‘Use an Existing Virtual Disk’


After clicking next, you will need to browse to the location of the .vmdk that is the mapping of the RDM. Previously I mentioned I created a datastore to hold my environments mappings because the Guest VMs in the cluster lived on local Host SSDs.
Browse to the datastore and location of the RDM/.vmdks.


Select the datastore where the RDM mappings exist.

Open it up.

Next open the folder for the Primary VM.
wait...


Ta-da! There is the RDM file created on the primary VM.


********* CHECK THE TIME STAMP. VMware did not do a good job AT IDENTIFYING THIS!!! *****
THAT or make sure your volumes are not all the same size!!
Translation: if you have already created multiple raw device mappings for the primary virtual machine, then you will need to pay attention to the time you did this, only if the volumes are all the same size. Otherwise you may point the VM to the wrong file.
My best advice is to map one at a time.
Start with the Primary VM, create the Quorum, then hop onto the Secondary VM and map it. This helps to ensure you don’t accidentally map the MSDTC to the Quorum. Your DBA will be mad!
Pay attention here. Remember the SCSI controller ID for the primary virtual machine??
You will want to make sure the IDs match on BOTH virtual machines.
So if the Quorum drive uses SCSI 1:0 on the primary, make that the same ID on the secondary!


While the Guest machine is off, make sure the SCSI controller is set to LSI Logical SAS if using Windows 2008 R2. Check VMware KB's for recommended controller types for other Guest OS’s. If you need to change the type, you can do this while it’s powered off.
Also, if the secondary virtual machine is going to ‘live’ on a separate host from the primary, be sure to select Physical Compatibility mode. It’s always safer to choose this option even if it will reside on the same host in the event of a host failure or if you run DRS fully automated.


Click OK.
If you followed all of these steps, then you shouldn’t have any errors. Continue to follow these steps for every raw device mapping you create.
A couple of tips if you are both the SAN and VMware admin for your environment:
Keep the Volume names on the SAN the same as what you name them in vCenter.
Try to use one pool for each ‘type’ of cluster, but not too many pools (unless you have mass storage available or are using SSDs or Flash (highly recommend checking out IBM's Flash Storage!).


3.7.12

How to Create Host Profiles in VMware ESXi 5.0


Click Home, then at the bottom select Host Profiles [here you can create new profiles, manage existing profiles, edit the answer files, and edit the attached cluster].


Next you will see the Getting Started screen. You can create a profile from here, by selecting the hyperlink “Create a Host Profile” or you can create from the button on the top of the task bar.


No matter which method you chose to begin creating a Host Profile, the ‘Create Host Profile’ wizard opens and you are prompted to either create a profile from an existing host or import an existing profile. [If you create from an existing host, make sure the entire network, storage, etc. configurations are satisfactory before choosing a host. This should be planned in advanced]


Click Next.
Select the host from which the profile should be created from.


Click Next.
Give your profile a name, and add something in the Description field [insert dates, and configuration information]. This is not required, but having some description helps when deciding to apply a profile to a host if Profile Manager is accessed by multiple people.


Click Next.
The Wizard shows you a summary of the new profile, click finish if everything looks acceptable, otherwise click back and edit the areas that need to change.


Once you click finish, notice the Active Task bar.


When the task completes, you should see your new profile in the list of available profiles on the left [this example we created TEST01]


Now, depending on the profile you would like to use, you will need to assign a datacenter and host to the profile for compliance. To assign a datacenter, right click the new profile and select Attach Host/Cluster.


First attach the Cluster by selecting the cluster, then clicking the Attach button. Next add the individual hosts underneath the cluster, clicking attach after each one. You can add multiple clusters and multiple hosts. When you are finished, click OK.
You will see the task in the active task bar at the bottom. When it is complete, your new profile is available, and the hosts and datacenter [cluster] have been attached to the new profile.


In order for a host to check compliance against a profile, it must first have a completed answer file.
Think of the answer file as containing the “dynamic” information within the environment [IP addresses, mac addresses, server name, etc.] All of these things are the dynamic information that should change from one host to another [with the exception of a duplicated DR site]. You can view the status of a hosts answer file by going to Home > Host Profiles > select the profile > click the Hosts and Clusters tab > then view the answer file status column.

To edit, the answer file on any given hosts, simply right click on the host, and select either Check, Update, Import or Export. Any changes you make to the answer file will not take effect unless you click Update.


If you make a mistake or are unsure about the changes you have made, simply click Cancel! You will not see all of the same options in the Answer File as you do the Profile. Remember Answer = Dynamic.
Once you have been through the process of inserting and applying all of the ‘user prompted’ information, Update the answer file. In the status should change to complete. You can check compliance against the profile to see if the changes you made are still in compliance or not. If not, put the host in maintenance mode, and apply the profile.

Host Profiles:

By right clicking on the Host Profile, you have a couple of options, they include:
Edit Profile: by editing the profile, you make changes to the “blueprint” of the golden host configuration without actually changing any configurations on any of the hosts, until you’ve applied that newly changed Host Profile to your hosts.


Enable/Disable Profile Configuration: This allows you to apply specific configurations to the hosts in which you are checking compliance. Simply uncheck the box and click ok.


Clone, Delete, Export. [These should be self-explanatory].

Attach Host/Cluster: this is where you can attach a cluster or hosts or both to the profile in which you are wanting compliance against.


Change Reference Host: the reference host is the host in which the profile was originally created from. For example, I have 3 hosts in my environment, Host1, Host2, Host3. I originally created Profile A from Host1, but my networking guy made drastic changes to the virtual networking on Host2, and those changes need to be applied to all of the hosts. By changing the reference host from Host1 to Host2, I can capture the changes and Update the profile to reflect.

Update Profile From Reference Host: Continuing from the example above, in order for the Profile to reflect the changes the Networking guy made, I will need to not only Change my reference host, but also Update my profile from the Reference Host. Updating the profile, changes the Static information contained in the profile.

After you have changed the reference host, and updated the profile from the reference host, be sure to check compliance against the other hosts in the cluster. If any are not compliant, put the host in maintenance mode and apply the profile.


Some TROUBLE-shooting Encounters & Measures:
General Error…
After some digging around and a lot of headache… check to make sure that IF your hosts log files are stored somewhere OTHER than local to the host, that the logging is working!! Sometimes this can be remediated by rebooting the host. Be sure to take the steps of turning off HA, and DRS if enabled on the cluster, then migrate the virtual machines off and reboot the hardware. This should kick start all of the services and fix any connection issues to the hosts logs.


9.5.12

VMware PCI Compliance Checker


The way it works:

The ESX 4.1 checker installs on on a windows desktop. You then tell it which hosts to run the check against. There is a web-based GUI that you are able to and view the results. It's very simple.

It provides details “rule by rule” indications of pass or fail. When issues are found, you are given an explanation and advice on remediation.

This can be used during an audit to demonstrate IT compliance.

This does not install agents on the hosts or the virtual machines. The reports are logged on the machine that you’ve installed the compliance checker on.

Some things to do prior to installing the Checker:
1. Download the Java exe
2. Make sure you remember where you install it.
3. Know the ESX hosts IP, root username and password.
4. Run the tool.

Make sure you have this first!


Pay attention to the Checker Version you download. I downloaded the PCI checker for ESXi 4.1 VMware Hosts. When I tried to run it against a V5.0 host, it failed....


This is a great little tool to use. Be sure to check out VMware's vSphere Security Hardening Report Check Script.

16.3.12

enabling windows 2008 application-consistent quiescing on esxi

*Updated 04.09.12
The reason behind this post…

The customer was using TSM for VE (tivolli storage manager for virtual environments) v5.x to backup their current VMware environment (ESXi 4.1).

The guest OS was Windows Server 2008 R2 and the backups would consistently fail to complete, throwing time-out errors during snapshot creation, but would sometimes complete if forced individually. The initial work-around was to set the diskUUID=false, and then let the backups run. Sometimes they would complete, other times they would time out.

The other problem with having the diskUUID set to false, was that they were only getting file level backups, when they needed application level.

After a month with IBM technical support (great group of people btw), the issue was definitely not found with TSMVE, and it was going to have to be addressed within the VMware environment.
So digging through various KB articles, and reading many blogs by other IT professionals, these were the changes that resolved many issues, after the configurations changes, the environment was now effectively:
  • giving application-consistent backups
  • snapshots no longer timing out when initiated by Tivolli (est. 8 seconds to complete)
  • successful restores
All of this by disabling VMware's VSS writers, and enabling the Guest VSS, the application was able to be quiesced.