First before I begin, this 'tutorial' contains a little more than just creating a Global Mirror from scratch. Recently the code on the V7000 at the Auxiliary site had been upgraded to 7.x. However when a DR test was performed using VMware's SRM & the IBM SRA the test failed.
What I found was, if I completely rebuilt the volumes at the DR site on the new code levels, the SRM test would pass.
Here is the process of removing the Auxiliary volumes, rebuilding them, creating a Global Mirror (no Change Volumes) and starting the replication process.
*You will need to have administrative privileges for both sites*
Terms: Master = HQ / Auxiliary = DR
Log into the Master V7000 (HQ perhaps).
Navigate to Copy Services > Remote Copy. Find the
consistency group you want to work with...

Right click the Consistency Group
and select STOP (this step @ HQ)

DO NOT select the “Allow secondary read/write access”.
Click Stop

Next, log into the
V7000 @ DR.
Navigate to Copy
Services > Remote Copy > Filter the view.
Repeat the steps
above.Right click the CG, and select stop. Do not
allow secondary reads/write access.
Make sure the Volumes are in a Consistent Stopped state.
Flip back to HQ.
Going back to the Remote Copy screen, find the
‘rcrel’ (remote copy relationship) you want to remove, right click the volume
(DR-VolumeName) and select ‘Delete Relationship’.

Verify the
relationship is the one you want to end. Enter the number of relationships you
are deleting.
Also, select the box
‘delete the relationship even when the data on the target volume is
inconsistent…’
Repeat this for every remote copy relationship
in the CG.

Once
you’ve deleted all of the relationships, the remote copy group will be empty
(this is OK).
This
does not mean the
volumes have been deleted. You can confirm this by navigating to Pools >
Volumes by Pool > select the Pool > filter by volume name…

If you have left over Change Volumes (like I did) then follow the next few steps. Otherwise, skip this part.
Flip back over to DR.
In the Copy Services
> Remote Copy screen you should also see an empty CG (consistency group).
Still @
DR…
Navigate to Pools
> Volumes by Pool > select the Pool > filter by name (volumeName).
Start with the Change
Volumes.
Right click the
change volume & select delete (change volumes should NOT have host
mappings).

Confirm by filling out the required fields.
Rinse and repeat for
every change volume at the DR site.
Switch over to HQ and do the same. Find the associated change volumes
& delete them.
Back to the DR V7000:
Next you’ll need to
unmap the two ‘actual’ volumes. First confirm in vCenter that the hosts do
not actually see them as usable datastores.
Open
the vSphere client, navigate to Home > Inventory > Datastores and
Datastore Clusters…

Back to the DR V7000…
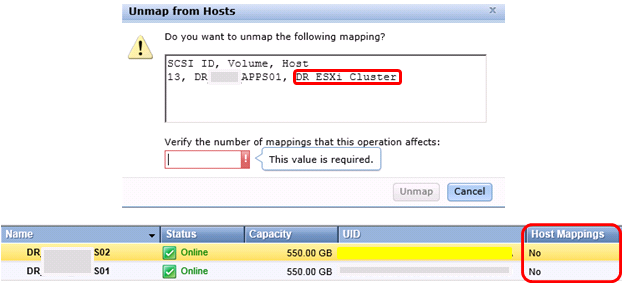
Right click the volume and select Unmap all Hosts. 
Verify the number of
mappings, then click unmap. The ESXi Hosts at the DR site have been presented to
the V7000 as a cluster, so while there are actually multiple hosts, you are only unmapping 1
because of the cluster.
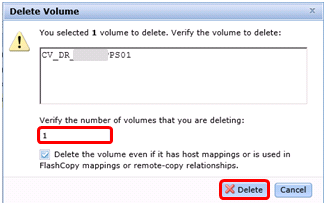
Next delete the Auxiliary volumes.
Right click the volume and select Delete. Just make sure you are still logged into the DR (auxiliary) site!!

…and now it’s time to rebuild…

Select Generic.
Select the exact same
pool where the previous volume lived (unless you need it located elsewhere).
Specify the Capacity
(in GB) and give it a name.
Click “Create and Map
to Hosts”

---Choose a Host---


This is where you begin to build the Global Mirror.
AT HQ
Navigate
to Copy Services > Remote copy > right click the Consistency Group >
add relationship.
Click
Add Relationship.

For this, you are not
adding Change Volumes, so select Global Mirror. Click Next.

The
Master volume is the volume at HQ. The Auxiliary is the new volume you just
created at DR.

CLICK
ADD. Even though previously you selected only Global Mirror, you will still be
asked whether or not you want to add a Change Volume. Select “No, do not add a
master volume”. Click Finish.

You’ll
be returned to the Add Relationship screen. If there are other volumes you plan
on adding to the Consistency Group, you can add those here. Use the drop down
to select the Master Volume (HQ) and the Auxiliary (DR). Click Add

You will be asked again if you want to create a change
volume, this is a pure Global Mirror, so select No. Then click Finish.

Once you’ve added all
of the relationships that will belong to this Consistency Group, click Next,
leaving the master and auxiliary fields blank this time. Review the
relationships you just created. If there is a mismatch, click the red X.
Otherwise, click next to proceed.

Because these were
newly created volumes at the DR site, select No, the volumes are not
synchronized. Click Finish.

Although
you’ve created the Remote Copy Relationships, synchronization has not started
To
be sure these are indeed a Global Mirror, you can right click the Consistency
Group & select Edit Consistency Group

This
will display the type (Global Mirror), the Cycling Mode & Cycle Period. If
this had Global Mirror Change Volumes, the Cycling Mode should be set to Multi
& the Period would not be greyed out. Click Cancel to close the window.

To start synchronization, right click on the consistency group & select start.

Depending on the size of the volumes in
the Consistency Group, synchronization may take some time before it’s
completely caught up.
To check the progress of Replication: Hover your
cursor over the blue circle, then click in the Running Tasks box.
I Manage a v7000 storwize but all the time the remote copy (Replication) change to state "Consistent stopped" and show the freeze time.
ReplyDeleteI have to make rigth click and start. This start (start consistency group) bring me again the state "Consistent Synchronized".
Can any one help me whit this problem?.
Can you be a little more specific? Is this consistency group in a Global Mirror, Metro Mirror or Global Mirror with Change Volumes? Your answer will help to determine why it's stopping. Also, do you know the pipe width that you are trying to push replicated data through? Thank you.
Delete