How to Create Raw Device Mappings in VMware ESXi 5.0/5.1 for Microsoft Clusters (SQL 2012)
Hardware:Hosts: IBM Flex System (4 node cluster x240s)
Storage: IBM Storwize V3700 & IBM Unified V7000
Software:
vCenter 5.1
ESXi 5.0 & 5.0 Enterprise
Microsoft Server 2008 R2
Microsoft Enterprise SQL 2012
Pre-Req’s: please read everything FIRST
1)
Volumes must be created individually on the SAN. Each volume needs to be the exact size
(with maybe 5GB extra) of the drive that will be mapped to the virtual machine.
For example:
a.
Volume A: 105GB (at the guest level- Drive E:\
size 105GB)
b.
Volume B: 205GB (at the guest level - Drive G:\
size 205GB)
2)
Also, because RMD’s create an additional .vmdk
file for every RMD drive, IF you do not have room in the datastore the virtual
machine lives in; you will need to create an additional volume on the SAN for
the RMD mapping files.
3)
In our environment, the SQL VM lives
on a datastore that is located on the physical
local SSDs on the server, so this was a required step.
4)
DO NOT add
them in vCenter. Map them from the SAN only
– otherwise, they will be formatted with the VMFS format which is different
than RDM. With the exception of the volume you create for the RDM files (see
yellow highlighted volume). You will need this later.
Create Individual volumes (exact size of the drive space needed) for every RDM you'll need.
Go ahead and create the volume that will be used for the RDM map locations, add it to vCenter.


Create Individual volumes (exact size of the drive space needed) for every RDM you'll need.
Go ahead and create the volume that will be used for the RDM map locations, add it to vCenter.

Map the new Volume to your hosts/cluster.

Once all of the volumes have
been created on the SAN (leave the window up, you’ll reference .naa numbers
(UUID) later), log into vCenter.
*** PLEASE NOTE: Prior to
creating the RDM’s, the virtual machine
MUST be powered OFF if it is to be used in a Microsoft Cluster (ie: SQL,
Exchange).
FOR THE PRIMARY VIRTUAL
MACHINE
Right Click the VM and
select Edit Settings.
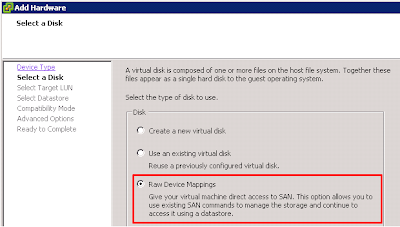
Select Add…

Select Hard Disk

Select Raw Device Mappings

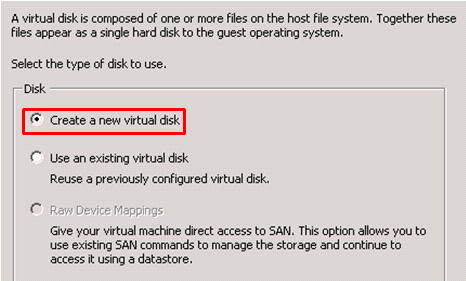
Because this is the primary virtual machine, select Create a
new virtual disk. One the secondary, you will chose differently.
All of the devices (volumes) that are available for RDM will
be listed. Check the SAN GUI for the UID and make sure that the one you want to
map matches within the configuration window in VMware. Also if the RDM volumes
are different sizes, this helps to make sure you are mapping the correct
volume.
*** Map what will be the Quorum Drive first *** this
eliminates a lot of tasks later on. I’ll not get into those on this tutorial.

Confirm the UID within the SAN admin GUI.
Next you select the datastore you want the RDM/LUN Mapping
files to be stored. Typically storing them with the virtual machine is
acceptable. Make sure you have efficient space in the volume the Guest VM
resides in.
In my particular situation, the primary SQL Server was
stored on local SSD’s on the physical host, so storing the RDM mappings was not
possible. I created an additional datastore to house these so they could be
seen by all VMs requiring access.

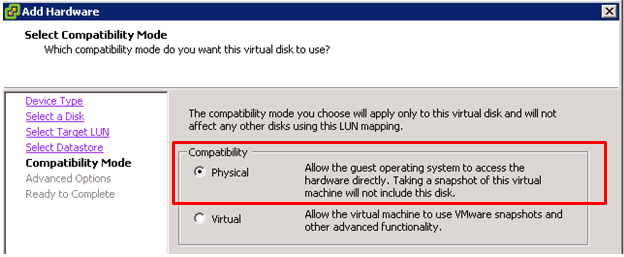
For the initial (primary) virtual server in the cluster I
selected Physical. I kept this setting for the secondary VM as well.
OK so even though the wizard says these advanced options do
not usually need to be changed, they
do; especially if you plan on creating multiple RDMs and sharing them within a
Microsoft Cluster of any sort.
Because the OS Hard Disk is using the SCSI ‘pool’ ID
starting with 0: I opted to use the drop down and select the first SCSI ID 1:0.
All consecutive drive connections using the SCSI controller in the 1:0-15 will
inherit the same properties. This is relevant later.

Confirm that everything is correct.

Before you click OK, on the Edit Settings window of the
virtual machine (it must be OFF) to complete this part.
Select the new SCSI Controller that was created when
creating the RDM drive.
Make sure that the ‘Physical” SCSI Bus Sharing is selected,
other wise when you map the secondary VM to the RDM file, it will fail (every
time!).
Also all additional RDMs created using this SCSI
controller will inherit the same properties, so drive sharing among VMs with
RDMs will be a success.
Click OK. You’re finished mapping the Quorum RDM drive to
the primary guest virtual machine.
For the Secondary VM that will share the drive:

Select Hard Disk.

Click Next. Because this is the secondary guest in the
Microsoft Cluster, select ‘Use an Existing Virtual Disk’

After clicking next, you will need to browse to the location
of the .vmdk that is the mapping of the RDM. Previously I mentioned I created a
datastore to hold my environments mappings because the Guest VMs in the cluster
lived on local Host SSDs.
Browse to the datastore and location of the RDM/.vmdks.

Select the datastore where the RDM mappings exist.

Open it up.

Next open the folder for the Primary VM.
wait...

Ta-da! There is the RDM file created on the primary VM.

********* CHECK THE TIME STAMP. VMware did not do a good job AT
IDENTIFYING THIS!!! *****
THAT or make sure your volumes are
not all the same size!!
Translation: if you have already created multiple raw device
mappings for the primary virtual machine, then you will need to pay attention
to the time you did this, only if the volumes are all the same size. Otherwise
you may point the VM to the wrong file.
My best advice is to map one at a
time.
Start with the Primary VM, create the Quorum, then hop onto
the Secondary VM and map it. This helps to ensure you don’t accidentally map the
MSDTC to the Quorum. Your DBA will be mad!
Pay attention here. Remember the SCSI controller ID for the
primary virtual machine??
You will want to make sure the IDs match on BOTH virtual
machines.
So if the Quorum drive uses SCSI 1:0 on the primary, make
that the same ID on the secondary!

While the Guest machine is off, make sure the SCSI
controller is set to LSI Logical SAS if using Windows 2008 R2. Check VMware KB's for recommended controller types for other Guest OS’s. If you need to
change the type, you can do this while it’s powered off.
Also, if the secondary virtual machine is going to ‘live’ on
a separate host from the primary, be sure to select Physical Compatibility
mode. It’s always safer to choose this option
even if it will reside on the same host in the event of a host failure or if
you run DRS fully automated.

Click OK.
If you followed all of these
steps, then you shouldn’t have any errors. Continue to follow these steps for
every raw device mapping you create.
A couple of tips if you are
both the SAN and VMware admin for your environment:
Keep the Volume names on the
SAN the same as what you name them in vCenter.
Try to use one pool for each
‘type’ of cluster, but not too many pools (unless you have mass storage
available or are using SSDs or Flash (highly recommend checking out IBM's Flash Storage!).
No comments:
Post a Comment